Monday, December 29, 2008

Another Guest Artist and Random Stuff

It seems weird to post another guest artist so soon. However, I am running out of time to post Christmas cards, and I wanted to share a card I received from my friend Donna. Not only is Donna a fantastic author and humorous reality tv blogger, she is an amazing crafter too. I had to use the word "crafter" because she pretty much does it all...cards, mini books, altered items, beading, etc. Not only that, but she is the most prolific crafter I know. It is disgusting.

For Donna's card, she stamped one of the Penny Black pea images onto white cardstock and colored it with Copic markers. Can you believe her coloring? It is wonderful! The image makes me smile too.

I hope everyone had a great holiday. I wanted to share some picts I took during a recent visit to Baltimore. There is a street in the Hampden area that is rather subtle with their Christmas lights.

Here is a shot of some of the row homes. Understated, yet chic. :)


Here is a shot of one side of the street from the other side. Notice how they have lights running across the street overhead. You know, because there aren't enough lights...


Some of the people let you come up on their porches (and even into their homes). Here is a shot from one of the porches.
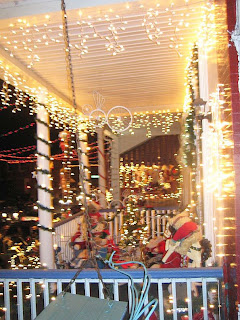

The next picute isn't the best, but it made me laugh. What is that sculpture you ask? Why, it is a metal Santa crab being pulled by eight tiny crabs. One of the crabs even has a can of Old Bay in hand. Gosh, I love Baltimore.


It wouldn't be Christmas without some blow-up decorations. Luckily, there were plenty to see.


Switching topics again..what do you think of the larger blog size? I noticed that most people have larger monitors than I do and maybe a larger blog and font size would be better. Let me know your thoughts.

Thursday, December 25, 2008

Merry Christmas!

I wanted to post a quick note to wish everyone a very Merry Christmas! I am spending the weekend with family in VA Beach and managed to sneak away for a few minutes to post. I think I am supposed to be helping with dinner, but if they can't find me...

Today's card is the one I made for my brother this Christmas. When I saw these stamps from Impression Obsession, I imediately thought of him. I can't tell you how many times I have been left with a face full of snow when around my brother. I have learned the hard way that Clint + snow = my humiliation and suffering. Thank goodness he lives in an area with very little snow.

To make the card, I stamped the snowmen with Memento black ink onto white cardstock. I added some B01 Copic marker to the edges of the snowmen to color them as well as the edge of the snow and parts of the snowballs. Even though snow is white, the hint of blue really makes them show up better. I added some clouds to the sky using my airbrush system, a cloud template, and a blue Copic marker. As a finishing touch, I edged the snow with a Stardust pen to make the snow sparkle a bit.

I hope everyone is having a wonderful holliday. I have more things to share with you, but I should probably go help my family with dinner. They do notice when I am gone TOO long. :)

Tuesday, December 16, 2008

Guest Artist

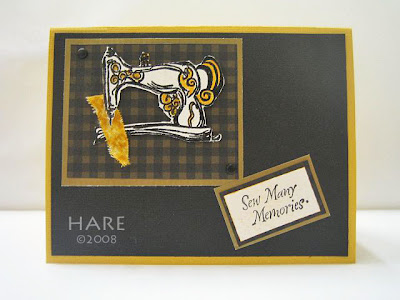
I just LOVE posting cards made by my friends. For today's card, I am posting one by my friend Harriett. She rocks! Not only is Hare a great stamper, but you wouldn't believe the things she can make with her sewing machine. Thanks to her I have embroidered towels, a fleece blanket with my initial, and a Washington Nationals bag with emblem and plastic pockets. Honestly, who can sew plastic?!

To make the card above, Hare used images by Prickly Pear. The sewing theme is just perfect considering the source. The sewing machine was black embossed onto cream paper and then trimmed around the edges. She then added some yellow marker to accent certain parts as well as added a real scrap of fabric under the needle. Perfect! Thanks Hare for letting me share your card.

I am still busy trying to get Christmas ready. I finished everything that needed to get mailed, so that is good. Now I just have to finish the rest of my shopping/gift making/baking. Wish me luck!

Monday, December 15, 2008

Color Challenge

As many of you know, I enjoy participating in Hero Arts' weekly challenges. I like them because they help me be more productive, and I find it easier to have a starting point when making cards. Sometimes they ask for themed projects or a particular style or layout. Last week the challenge was to come up with cards using colors as inspiration. Each day had a different combination to consider. I went with Monday's combination and made two thank you cards. Here is the swatch of colors from Monday:

I found it harder than expected to include all five colors. Fun, but hard. For both cards, I used one of the brand new Hero Arts sets called "CL304 A Million Thanks." I suppose I didn't need a new set to be inspired, but it never hurts.

For the card above, I stamped a saying from the HA set onto cream paper using Chestnut Colorbox ink. I surrounded it with a Sassafraslass frame which was stamped in blue Versafine ink. The flowers and leaves were stamped onto cream paper using black Memento ink and colored with Copic markers. I cut out the flower and leaves and added them to the card. I don't know if you can tell from the picture, but the flower is popped up with some foam-mount tape. The background paper is by October Afternoon. I thought it went really well with the color combination. In fact, I think it looks like it IS the color combination in stripe form.

For the second card, I stamped the flower image onto cream paper using black Memento ink and colored it with Copic markers. I then added a saying with blue Versafine, some brown brads, and some more paper from October Afternoon. I don't think it hurts to have extra thank you cards this time of year!

Thursday, December 11, 2008

Two Weeks?!

Someone said to me yesterday, "I can't believe Christmas is two weeks away." I said, "no its not..it is....oh my gosh....Christmas is two weeks away!!" I am really, really not ready. Let me check my list. Christmas cards? Nope. Presents ready? Nope. Decorations? Nope. Yikes. Of course, my friend Deedee is no help. Her package arrived from New Mexico today with Christmas presents for me as well as a birthday present. My birthday is in January. She is such a show off.

I thought I would post a card today that represents my dream of a magical being coming to get everything done while I lounge on a sofa with some sort of girlie drink. I don't think it will happen, but I haven't given up all hope. After all, I am buying a Megamillion lottery ticket tomorrow, and I think 207 million dollars could make that dream a reality.

To make the card, I used some of my pretty new Gingercake paper from Memory Box as the background. I just love their papers! I stamped the drink onto Paper Cut White Luster paper using Memento Black ink. I then colored it with Copic markers and added a layer of Diamond Glaze to the glass to make it shiny. To accentuate the ornament hanging from the glass, I added some Stardust pen to the star and a tiny clear rhinestone to the center. I finished the card with a saying that makes me smile every time I read it. Both the glass and saying are by My Favorite Things.

A post script for my last post.... my mom called and said my "Barbra" moment was incorrect. I misspelled Barbra Streisand's name. She pointed out that if I were a TRUE fan, I would know that from her "My name is Barbra" album. I stand corrected. :)

PS...do I at least get some points for being able to keep up with Barbra's version of Jingle Bells? I think that shows I have listened to it a time or two.

Monday, December 8, 2008

Speaking of Airbrushing....

What a weekend! It was so busy for me. Wonderful, but busy. It started Saturday with the Holiday Open House. I would like to thank everyone who stopped by Angela's to wish us well and especially thank everyone for bringing in so much food. I am not sure exactly how much food was donated, but we ran out of room at the store to keep it all. Harriett's husband Jim was kind enough to come midday to collect the first round of donations so that we could stop tripping over everything. It was definitely more food than we expected!

I was inspired by my open house demos to show another card I made using the Copic airbrushing system. To make the card above, I took some clear acetate paper by Hambly that was pre-printed with white snowflakes and airbrushed it with blue and purple Copic markers. Because the Copics are alcohol-based, they will dry on difficult surfaces such as glass, ceramics, plastics, and acetate. Once I finished my winter looking background, I added a saying and a cute little Santa owl from Hero Arts. I think a snowflake image or embellishment might have looked better on the card, but I am still on my owl-kick, so I had to add him to the card instead. The nice thing about this card is that it was extremely fast to make.

The next part of my weekend had nothing to do with crafting, so feel free to tune out at any point!

I am still rather giddy from my Sunday night trip into DC to watch the stars arrive for the taping of the Kennedy Center Honors. It is something my friends and I have started doing, and it is just so much fun. The best part evening was that I had a Barbara moment! That's right, Barbara Streisand came over to where we were standing so that we were only a few feet apart, and we even made eye-contact. It was fantastic! We also got to see the other honorees (Pete Townshend, Roger Daltrey, Twyla Tharp, George Jones, and Morgan Freeman) as well as Clint Eastwood, Jack Black, Tom Skerritt, Aretha Franklin, Queen Latifah, Babyface, Quincy Jones, Beyonce, David Gregory, and tons of politicians (Madeline Albright, Newt, Tom Daschle, Mark Warner, and Nancy Pelosi). I think I was most excited to see Taye Diggs and Idina Menzel. He is just such a babe, and I love her voice. Plus, they are a really cute couple. Dave Grohl was fun to see not only because I like the Foo Fighters and Nirvana but also because I could imagine my friend Donna saying, "hey, he was just on Top Chef." :) I am bummed that I saw people that I knew but didn't recognize at the time. I didn't recognize Donna Karan, Joss Stone, or Chris Cornell. I am really sad that I didn't recognize Chris Cornell because I play his version of "Billy Jean" all the time. Rats! I am also sad that I only got a fleeting glance at Rob Thomas. Oh well. I guess I am just going to have to make do with my Barbara moment.

Friday, December 5, 2008

Airbrush Tutorial

As I mentioned in my last post, there is a Holiday Open House at Angela's on Saturday (tomorrow). What I failed to mention is that I will be doing a free Copic airbrush demo from 10:30am- 11:30am and again from 2-3pm. It is the same demo for both sessions, so hopefully people will be able to attend one of them. While preparing for the demo, I thought it was also an opportune time to post pictures of one of the techniques I will be showing. Posting a bunch of pictures for a tutorial really makes me appreciate people who do it on their blogs all the time. Yikes!

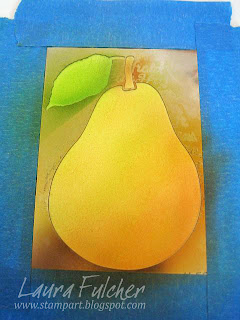
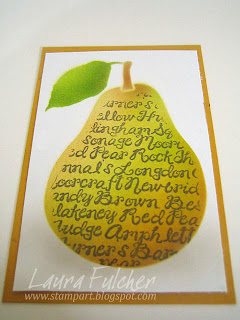
For today's tutorial, I used my airbrush with a brass stencil of a pear.

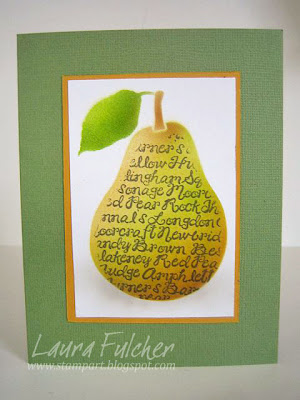
This is a close-up of the finished card. You would be able to get similar results with pigment inks and a makeup sponge if you didn't have an airbrush. However, the airbrush really allows you to have smooth transition of color.

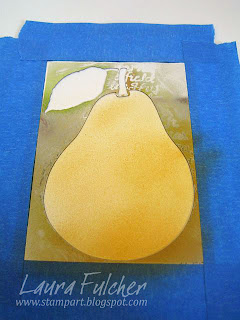
I first placed the stencil onto white cardstock and held it down with stencil tape. Regular masking tape will also work if you "de-tack" it a bit on your skin or clothes before you lay it on your paper.

I sprayed the body of the pear with YR23 (Yellow Ochre). I hope you can tell from the picture that I tried to add more color to the right side and bottom of the pear. To add extra color with the airbrush, try holding the airbrush closer to the paper as well as pressing the trigger a bit harder.

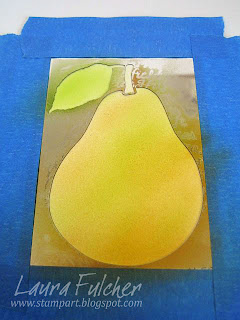
Next I added YG03 (yellow green) to the leaf area as well as the body of the pear.

I added some more shading by applying YG67 (moss) to the bottom of the leaf and some E35 (Chamois) to the stem and bottom of the pear.

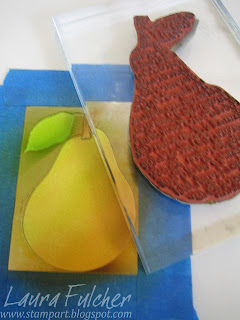
I could have left my pear "as-is," but I decided I wanted to stamp over the pear with some pear words. You will notice that my stamp was also in the shape of a pear, but it just happened to fit nicely over my stencil. You could use any sort of background image for this step...swirls, script, checks...whatever.

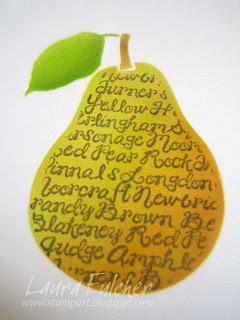
I inked my stamp with green ink and then stamped it over the stencil.

When I removed the tape, I was left with the image above.

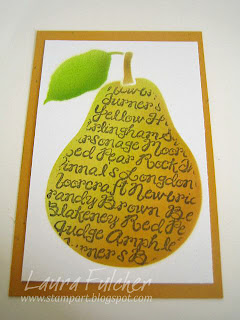
I layered my pear onto some orange cardstock and thought it looked a bit like it was floating in air. I took it back off the cardstock and did some more airbrushing.

I airbrushed some W1 (Warm Grey 1) along the bottom of the card to ground my image. To finish the card, I simply layered it onto some green cardstock. I hope to see some of you tomorrow!

Wednesday, December 3, 2008

Noel

Hello again! I hope everyone had as wonderful holiday as I did. It was so great to have some time to spend with my mom and brother. Thanksgiving truly is a time to be grateful for our friends and family. I am also VERY grateful that my car decided to have problems AFTER I returned home and not somewhere along the highway. As much as a pain as car issues are, I realize how perfect the timing was.

Anyway, back to crafting.... today's card is one that we will be doing in Sunday's upcoming 10 in 10 card class. It is a good card to do if you still haven't made holiday cards because it takes absolutely no time to make. I stamped the holly background (Hero Arts) onto dark green cardstock using Versamark ink. I then brushed the ink with Forever Green Perfect Pearls and removed the excess with a paintbrush. Perfect Pearls add a metallic sheen to cards that I just love. To finish the card, I spelled out "NOEL" with some Hero Arts letters and layered them onto some metallic gold paper. Done!

For those of you who enjoy blogging and taking pictures of your cards, you probably know how hard it is to photograph things that are metallic. This is the best picture of the bunch I took. To show the shimmer, I put the card on my white foam board and put a small lamp between me and the card. I wrapped my arms around the lamp to take the picture. It was a bit awkward, but I think it captured a bit of the shimmer (at least towards the center of the card).

For those of you who shop at Angela's, I hope you are planning to stop by the store this Saturday for the Holiday Open House. There are all kinds of events planned, and you can read more about the day here. I primarily wanted to post a reminder because in addition to all the fun, I really hope people plan to participate in our community outreach event. We are collecting food for Southeast Washington DC Ministry's food pantry and can use your help in collecting supplies. I am still thinking about the news story I saw last week where the Redskins handed out 3000 turkeys to those in need. They do this every year, but this year it wasn't enough for everyone to leave with a turkey. This year, the number of those requesting help doubled and people started lining up at 2am in hopes of receiveing food. It just broke my heart. Anyway, here are the items that were requested that we are collecting on Saturday:

Please adhere to specific sizes & brand names if listed.
Green Beans - 28 oz
Peas - 15/16 oz
Applesauce - 16 oz
Corn - 16 oz
Fruit Cocktail - 16 oz
Pears - 16 oz
Pineapple Chunks -16 oz
Peaches - 16 oz
Elbow Macaroni - 16 oz
Jelly - 18 oz
White Rice - 16 oz
Peanut Butter - 18oz
Macaroni & Cheese - 16 oz
Sugar - 2lb box/bag
Vegetable Soup - Family Size
Campbell’s Pork ‘n’ Beans - 28 oz
Chicken Noodle or Rice Soup Family Size
Juice Concentrate (not frozen) Apple, Punch, Berry or Grape
Kool-Aid small envelopes unsweetened packs
Honeycomb Cereal - 16/20 oz. size
Fruity Peebles Cereal - 16/20 oz. size
Tuna Fish, packed in water - any size
Ravioli beef - any size
Spaghetti O’s with meatballs - any size
Beef-a-Roni - any size
Ramen Noodle Chicken flavor packs - not cups
Jell-O snack cups - any flavor
Pudding snack cups - any flavor

Hope you can help!

Tuesday, November 25, 2008

Thanks

Last week I participated in a Hero Arts blog challenge to create a thank you card that used at least one scrap. My usual M.O. with scraps is that I will throw all kinds of left over bits into a shoe box and then forget about them. In this case, the "Thanks so much" languished there for many years before I finally had cause to use it. I knew I saved it for a reason!

To make this card, I ran a blue HA card through my Cuttlebug and embossed it with three flowers. I then used sand paper to scuff the flowers a bit so that they would show up better. The only problem I had with this step was that the dots on the flowers weren't the same height so some parts were easier to sand than others. To finish the card, I painted the borders with white acrylic paint and added some rhinestones and some birdies that I colored with Copic markers.

I hope everyone has a safe and wonderful Thanksgiving filled with friends and family. I am off to VA Beach to spend the weekend with my family. My mom texted me today that she shopped for "vittles and vino," so I guess we are good to go. My family can always make me smile!

Sunday, November 23, 2008

Thinking of You

Today's card features an image I colored when I took a class from Karen Lockhart. As you may know, I just LOVE coloring. Therefore, you can imagine how thrilled I was to be able to take one of Karen's classes. Her cards always look amazing.

To make the card, I colored a Lockhart image using Prismacolor pencils. The trick to this card is that it uses a technique where you first lay down a layer of gray pencil here and there to the stamped image. It was interesting to see how a base coat of gray affected the subsequent layers of colors that were used on top. I also tried to apply more pencil to some areas than others so that it would look as though there was some shading.

To finish the card, I punched out the image with a circle punch and layered it onto a blue scalloped circle. The background paper is by Memory Box and the saying is by Hero Arts.

Well, I would say more, but Sunday is my night for TV. I could say I was off to watch "Masterpiece Theater," but I have to admit a certain weakness for "The Amazing Race" and "True Blood."

Wednesday, November 19, 2008

New Technique

Last weekend when I was participating in the Virtual Stamp Night, I learned a new technique called "thumping." The name alone made me want to investigate further. Basically, you ink up a background stamp and then "thump" the stamp with various water-based markers to add additional spots of color. In this case, I inked a Hero Arts snowflake background with grey ink, thumped it with various blue and purple markers, then stamped it onto some white cardstock. If you want to see the original instructions for this technique, you can check it out here.

There are a couple of things to keep in mind with this technique. First, you want to use the sides of your markers when you thump the background stamp so that you don't hurt the tips of your markers. Second, I found that using a light color for the background stamp works best. The first card I made with these stamps didn't turn out so well. I used a medium blue ink for the snowflakes, and the marker colors I used on top didn't really show up. I switched to the grey ink and liked the results much better.

To finish the card, I added some clear Spica pen to the large snowflake to make it sparkle. There is also a rhinestone in the center of the snowflake. However, it is hard to see either in the photo.

Sunday, November 16, 2008

Love those owls!

This weekend I participated in another Virtual Stamp Night at Splitcoast Stampers. The above card was one I made for the "Chorus Line" challenge. Basically, I needed to make a card that had at least three of the same image used in a row. During my last VSN, my friends made fun of me because many of the cards I made had candy corn on them. This time, I used owls on a bunch of my cards. I guess I find something I like and "go with it."

To make the card, I stamped a branch by Hero Arts onto some Memory Box paper using brown ink. I wanted the leaves to be green, so I colored over the brown ink using a green colored pencil and added some red pencil to the center of the berries. I stamped the owls using Memento Rich Cocoa ink onto white paper and colored them with Copic markers. I cut out each of the owls and added them to the branch and added a saying from My Favorite Things to finish the card.


For the second card, I made a spinner card using the same owl image. Spinner cards have an image on a track that spins when you tip the card. I love watching the little owl spin head over heels to the right side of the card and then spin back to the left. If you would like spinner card instructions, they can be found here. Once again, the owl was colored with Copic markers and placed on top of a Hero Arts branch with a saying by My Favorite Things and paper by Memory Box.

Thursday, November 13, 2008

Okay, Okay

I knew I was running out of time before people would start calling or emailing to ask why I wasn't updating my blog. I was right. 2 emails and one call came yesterday. I thought I better post something before things turned ugly. I have been absent for a couple of reasons. First, things have just been busy around here between work and "life." Second, and most importantly, we switched to Fios at my house, and saying that it hasn't gone well is an understatement. My once beautiful wireless internet connection has been reduced to the speed of dial up. I haven't been able to read other blogs, participate in card challenges, or update my blog. Sorry!

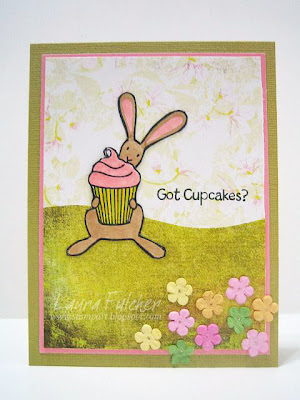
The card I am posting today seems rather random to me. It looks really spring-like and out of place. I just couldn't help myself. I wanted to try out my new stamp set from My Favorite Things and some of my favorite paper from Basic Grey, and this is the finished product. To make the card, I stamped the bunny onto white paper with black Memento ink and colored him with Copic markers. I added some clear Spica to the top of the cupcake, but you can't see the sparkle in the picture. I cut out the bunny and added him to some paper I had layered onto pink cardstock. The saying is also from the same cupcake set. I finished the card by layering it onto green cardstock and adding some flowers by Prima.

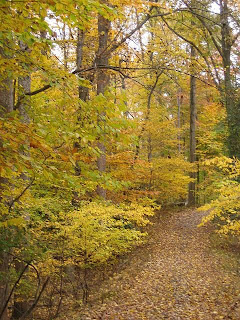
To make up for the spring card, I am including some pictures from a recent walk in Great Falls, VA. I sure love fall in Virginia. This has nothing to do with crafting. I just liked the colors.


The trees were gorgeous. Unfortunately, I don't know much about botany, so I named them "yellow trees."

Here is another beautiful tree. I call it "red/yellow/orange tree with a hint of green."


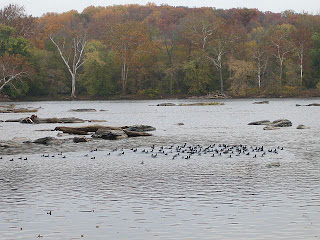
I enjoyed this flock of birds, but they weren't ducks, so I didn't know what they were. I'm guessing they are "waterbirds."

I was quite taken with the leaves from this one tree. They were HUGE. I put my foot in the picture as a reference. I wear a size 8, so you can see why I named them "large leaves," or "leafus maximus" in Latin. :) Bonus points for anyone who can name some of the items on my nature walk. I am curious what they really are.

Thursday, October 30, 2008

Happy Halloween!

Technically, it isn't Halloween yet. I have about an hour and 15 minutes to go. However, I need to get to bed, so this will have to do. :)

For today's card, I am posting one I made for Hero Art's paper challenge. The challenge was to incorporate patterned papers into your card design. I decided to use a bunch of scraps I had of Basic Grey's Ambrosia line and weave them with black paper to make a background. It took a bit of time, but I was pleased with the finished product. I knew the papers would coordinate because they came from the same line, and the colors seemed to "scream" Halloween to me. (sorry for that). I tried to vary the widths of the paper so that it would look a little more interesting. To finish the card, I added a pumpkin and saying from Hero Arts. The pumpkin was colored with Copic markers (of course).

I hope you all have a Spooktacular Halloween! (Sorry again).

Tuesday, October 28, 2008

Playing with an Airbrush

One of the things I got to play with during the Copic certification class was their airbrush system. I went from from wanting one to "needing" one over the course of a few hours. Sad. So sad. I am posting a couple of cards today that I did while playing with the airbrush. I am still learning, but it is just so much fun!

The first card is one I made by spraying a Glimmer Chip with yellow, orange, and red Copic markers. The bird chip was originally plain white with a brown swirl in the center. I simply added some color to the top. The whole thing took about 10 seconds.

For the second card, I experimented with spraying on top of a stencil. The base of the card was a yellow/orange paint chip. I placed a flourish stencil on top and sprayed around the stencil with an orange marker. To finish the card, I stamped some brown leaves over the whole thing. I still need to practice, but playing with the airbrush gave me a ton of ideas of things I would like to try with it.

On a personal note, I was lucky enough to go to VA Beach last weekend to visit my mom and brother. It was just before the weather turned cold, and it was simply beautiful at the beach. For those of you who need a serenity beach moment, I am including a picture:

Tuesday, October 21, 2008

IO Design Team Challenge-Tags!

Time again for another Impression Obsession Design Team Challenge! This time the theme was "tags." I thought it would be fun to make a card with a tag as well as some mini tags in time for the upcoming holiday season.

For my fall tag card, I ran some cream paper through an Accu-Cut machine to cut out my tag. I then stamped a maple leaf repeatedly over the tag using yellow, orange, and red inks. To finish the tag, I sponged some yellow ink and lightly splattered some brown paint so that the tag wasn't so stark in color. To complete the card, I layered the tag onto brown paper, added a leaf border, and popped a saying up on top of the tag.

After making the card, I decided to make some quick and easy tags for my holiday presents. If you are like me, you might be planning to make your own gifts this year. Adding a handmade tag to your gift is a great way to embellish your present.

For my three mini tags, I used one of my favorite IO sets called "handmade." For the left and right tags, I simply stamped an image in black ink onto an office tag. I don't think you can get any easier than that! The right tag was embellished with a rhinestone heart, so that did add an extra 10 seconds to the project. :) For the center tag, I stamped my saying in the center and added a flourish around the edges. To finish the center tag, I added some rhinestones and some red Stickles to the flourishes. I decided I liked the extra bling on the card.

If you would like to see more tag ideas, check out more samples made by Daniela, Deborah, Kelli, Julie, and Dina.

Well, I'm off to bed. It was a late night for me. I was lucky enough to have the chance to go into DC tonight and see Jason Mraz. He is definitely one of my favorite artists. I had a fantastic time at the concert even though the person behind me spilled a glass of wine down my back. At least it was white! In case you need a little Mraz fix today, I am including a link to his "I'm Yours" video. Jason Rocks!!

Saturday, October 18, 2008

Trying to Catch Up

I have to confess I sort of forgot about blogging this week. I feel like I am trying to catch up with everything and not getting much accomplished. Currently, I am trying to prepare for my Holiday 10 in 10 class next week. I assume it will all get done. :)

For today's cards, I am posting 2 of the 10 cards for next week's class. I love to do the 10 in 10 classes, but there is so much planning involved. I want quick cards that all look different from each other (and previous years) and use various mediums and tools. Then I have to plan how to organize the classroom so that cards that use the same materials are next to each other. Finally, I have to prep materials for 10 cards per student and check to make sure items I use haven't been discontinued. Yikes!

The snow scene above was really easy to make. It is a brayered background with trees (Stamp A Mania) stamped in Brilliance Moonlight White. I added some white reinker under the trees to look more like a winter ground and a saying by Inkadinkado to finish the card.

The second card had to be changed because I originally used a stamp that was discontinued (should have checked that first). The background Christmas words are by Inkadinkado and the holly is by Kodomo. I stamped the holly with green VersaFine ink and colored them with Prismacolor pencils. If you wanted, you could make the card even faster if you used patterned paper instead of a stamped background and stamped holly.

I hope everyone has a wonderful weekend!

Monday, October 13, 2008

Masculine Cards

Last week's Hero Arts challenge was to design a card with a masculine look. I am posting the two cards I designed. Both involved the use of cork and both required a trip to Home Depot for hardware. After all, I needed gold hardware and not silver hardware! Sigh...I am such a girl.

For the first card, I stamped a bunch of ferns onto cork using Colorbox Chalk Dark Brown ink. I find that pigment ink stamps better on cork than dye ink. I added a saying and then layered some gold washers and nuts to the bottom of the card. Diamond Glaze worked really well to hold the heavy metal accents to each other and to my card.

For the second hard, I wanted to have a "floral" card even though it was a card for a man. I stamped some abstract Hero Arts blotches onto cream paper using the same brown ink as before. I cut out the blotches and then added washers and nuts to the centers. There is a brown brad in each of the center holes, but they aren't holding the hardware to the card. Once again, Diamond Glaze came to the rescue! I stamped some stitches to the bottom cork piece and then added a saying to finish the card.

A couple of side notes about the cards. First, I think I used all discontinued stamps...sorry! Hero Arts tends to come up with new stuff all the time, but they also discontinue stamps quickly as well. It is hard to keep up with them! I did try to use some generic images. I am sure many of you have similar stamps already. Second, when working with cork, you need to be careful where you place it on your card. It is hard to pull the cork back up if you decide to move it to a different location. Once it is down, it is down.

Thursday, October 9, 2008

Halloween!!

I can't remember the last time I was on a crafting roll. I am usually lucky to make ONE card in an evening. I wish I were a prolific crafting machine, but I'm not. Therefore, I was ecstatic to make four cards the other night. That's right....four in one night! If you are good with math, you might notice only three cards here. The fourth I am going to try to get published, so I can't post it online.

I think one thing that helped me create more items was that I limited myself to two stamp sets by My Favorite Things, my black Memento pad, my Copic markers, and a pack of Memory Box papers. Then I was good to go! I find that if you take away a lot of your choices, you don't spend as much time second guessing yourself.

You can't tell from the picture but there is clear Spica pen on the cobwebs and green Spica on the cauldron steam to make them shimmery. The cauldron and ingredients are also coated with Diamond Glaze to add some visual interest.

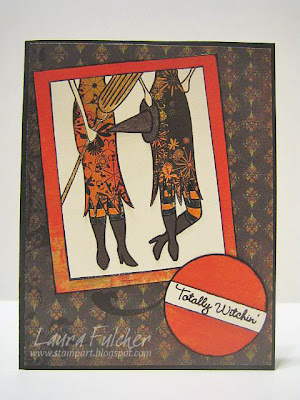
The final card was created with paper piecing. I stamped the witches onto cream paper and again a couple of times onto some patterned paper. I then cut out elements such as the dresses and hats and glued them to the image stamped on cream paper.