Thursday, May 29, 2008

Monkey Business


Just a quick post today. I wanted to post something to let you know about a cool blog candy opportunity. Each of the Impression Obsession Design Team Members have an assigned month to give away some great IO stamps (look for me in August). This month is Tina's turn, and you are going to love the stamps you could win. Leave a comment on her blog for a chance to win!

Speaking of Impression Obsession, the Design Team page has been updated on their website if you want to check out some of the work we have done. It is always fun to see how people create different projects using the same exact stamps.

For today's card, I did a similar faux batik background as the one I did for a recent bluebird card. I am including a link to that post for the general technique instructions. Instead of blue sprays, I chose a selection of greens. All of the stamps for this card are by Hero Arts. The monkey and leaves were stamped with Memento ink and colored with Copic Markers. I cut out the leaves and glued them on top of the white square. I popped up one leaf on each side for a 3-D effect. I also popped up the saying. Hope everyone has a great day, and I hope one of you wins the stamps on Tina's blog. Good luck!

Monday, May 26, 2008

Happy Hello


I thought for today's post, I would post a card and then follow it with an interesting DC event for those of you who live in the area. That way, people who are here just for the crafts won't have to read as I blather on and on.

I made the clear card posted above as part of the Hero Arts floral challenge. I am mostly happy with how it turned out. Do you ever feel that way when you finish a card/project? Something just feels a little "off" to me. Perhaps it is the fact that the two blues don't match. Hummm.. I just don't know.

Anyway.... to make this card, I took a clear acetate card and stamped a floral background using blue opaque Staz On ink. I have fallen in love with my opaque pads! I bought the pads a while ago and never used them. However, I am going through a clear card phase and have used them a lot lately. I think the opaques are so much better than regular Staz On when stamping on acetate. The results are quite dramatic.

I stamped the flowers onto white, smooth cardstock using my black Memento pad. I colored them with Copic markers but didn't worry about any shading. I wanted the flowers to be solid and bright. I punched out the flowers with an oval punch and added a thick layer of Diamond Glaze over the top to look like glass. I let my Diamond Glaze dry overnight. Trust me, this works best!

I added a blue oval scallop, ribbon, and saying to finish the card. I might have to try doing this card again to get it right (at least in my mind). Then again, I may just move on to another card and another challenge. Decisions, decisions.

Last Friday, I went to go see my friend Julie perform a belly dancing routine in DC. After I got over the fact that it STARTED at 10pm (I am getting to old for this), I was excited to get the chance to check out Artomatic. Basically, Artomatic is an art show that occurs for one month of the year in DC and features over 1100 local artists of all vocations (poets, painters, dancers, musicians, photographers, etc). Someone donates a location, artists display their works, people donate their time to run it, and the public is welcome to visit (for free). My friend Julie said that it was bigger than she anticipated. I figured it would be the size of a community center. Boy, was I wrong. Artomatic takes up 10 FLOORS of a DC office building under construction! Yikes! There is plenty of art to see, lounges, a tattoo parlor, shopping, bar areas, and much, much, more. Trust me, it is something to see.

The picture above is one of the floors of art. It is just to give you an idea of what the interior looks like. We only saw a fraction of all the art.

The best thing about Artomatic is that it houses the finalists of the Washington Post Peeps contest held every year at Easter. For those of you who live out of the country and might not know about Peeps, they are disgusting marshmallow candies sold at Easter in the shape of bunnies or chicks. The Washington Post has a contest encouraging people to make dioramas with Peeps. Here are two of my favorites:
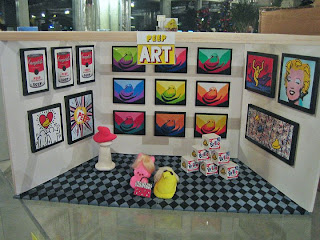
Notice in this one that they made a tiny wig to make an Andy Warhol peep. Plus, they made Peep pop art for the walls. Love it! It is worth clicking on this picture to enlarge it. With a larger picture, you can see that even Marilyn Monroe's hair has Peeps in it. Wow.

One of my favorite movies is "A Christmas Story." I laughed so hard when I saw this one. I could hear the line "Fra-gee-lay...must be Italian" going through my head when I looked at it. Classic!

If you have a chance to go, Artomatic is right next to a Metro stop and is open till June 15th. I just wanted to share.

Friday, May 23, 2008

CPS Challenge #65

Well, I finally finished my sketch challenge card. Whew! For some reason, the branch photographed looking kind of red/orange to me. However, I am on photograph overload, so you are just going to have to picture it a browner color in your mind!

This sketch challenge was provided by Card Positioning Systems, and I wanted to participate. Part of the reason why it took so long was I wanted to brayer the background. This usually doesn't take very long because I normally use white glossy paper and a Kaliedacolor ink pad. However, for this card, I wanted to use certain blue colors and they were blending TOO well on glossy paper. I was ending up with a solid blue piece of cardstock. What is the point of brayering if you can't see the different colors? Here is a breakdown of the card:

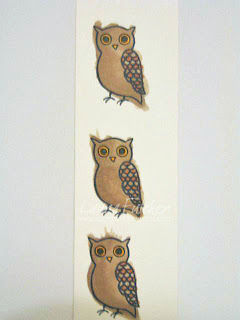
First, I stamped some owls by AMuse onto cream cardstock with a black Memento pad. I stamped multiple owls because I was making more than one card at once. I then colored the owls with Copic markers.

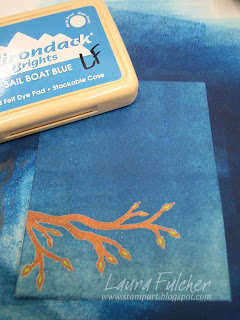
For the background, I stamped a branch from another AMuse set with brown pigment ink and embossed it with clear powder. I colored the insides of the leaves green, covered them with VersaMark ink from a pen, and embossed again in clear. This step was wasted because I ended up cutting out leaves and layering them on the card....explanations later! I then brayered back and forth and back and forth with my Cloudy Blue ink. I must have inked the brayer about four times and rolled it onto the paper multiple times between inkings.

I repeated those steps with the Sailboat Blue ink over the top 2/3rds of the card. I made sure not to cover up all that I had already done.

I finished brayering with the darkest blue ink over the top of the card. Remember, this was regular cardstock, so I had to go back and forth and back and forth to blend and get rid of lines. Have I said this enough yet? :)

I cut the card into three strips to match the sketch layout. I edged the pieces with the dark blue ink pad because the cuts showed the cream paper underneath. I also sponged some black ink to the top. This picture also shows how I stamped the owl again onto the bottom panel so that I could glue a little owl body on top. I did it this way so that I wouldn't have to cut out little owl feet. I added a saying with black ink, popped up the owl on top of the feet, punched out a yellow circle and popped it up on the card, and added "stars" with a stardust pen. I ended up cutting out leaves for the branches because I made the mistake of inking the entire branch with brown ink. By the time I embossed the branch, there was very little of the leaves left to color. I wanted more green on the leaves, so I cut some out freehand with green paper. Hope this tutorial helped!

Thursday, May 22, 2008

Quick Card

I was planning on posting a card based on a sketch challenge I liked, but I am still not done with it. It isn't as if it is that hard of a card, but I am having to brayer it, and brayer it, and brayer it to get nice coverage of the paper. Sooo....I decided to post this flower card instead. Trust me, when a card takes a long time to make, it really makes you appreciate the quick cards all the more!

For today's card, I took some patterned paper from Little Yellow Bicycle, stamped some pink flowers on it, and added a saying. That's it! Both stamps are by Hero Arts. I have said it before, but I'll say it again, if you want to make a really quick card, choose a great patterned paper and stamp on it. Let the patterned paper do most of the coloring for you.

I promise to post the other card soon!

Sunday, May 18, 2008

Smile Crocodile!

I have been playing around with the format of my blog this weekend, and I thought I might try posting "large" photos instead of "medium." Which size do you prefer? Any thoughts? You can still click the photo to make it bigger, so which picture works better on the blog page? Decisions, decisions.

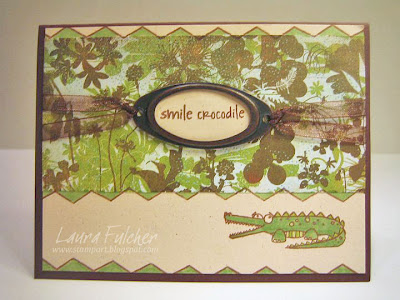
We had more rain the past couple of days, so I thought it might be nice to post a card reminding me to smile. The crocodile is from a fun animal set by Hero Arts. I swear, whenever I see a cute animal set with coordinating sayings, I immediately want to own it!

I made today's card for a challenge where you had to use a buckle somewhere on the card. The design itself is very easy. I just used some patterned paper that looked like it would compliment a crocodile and layered some ribbon and a buckle on top. The crocodile was colored with Copic markers, and I added a zig zag border by Impression Obsession that reminded me of crocodile teeth. I colored the zig zag with the same green as the crocodile. Easy!

Speaking of rain, those of you who live in the area might appreciate the next picture. I recently went to Great Falls to do some hiking. I took a visitor with me to show off the park. What could be better? It is a wonderful park, the falls are beautiful, and it is a nice place for a picnic. Only one problem..... we have had so much rain, that there are NO falls! The water is so high that the water doesn't actually fall down. It looked like a fast moving river instead. I kept saying, "that's where the falls usually are." I don't think it had the same effect as seeing them in person. Granted, the falls aren't huge to begin with, but this was ridiculous!


PS...the falls picture is medium sized. Which size is better? Yes, I am back to that topic.

Thursday, May 15, 2008

IO Design Team Challenge


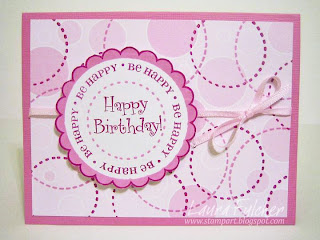
Today is a special design team challenge because it is in honor of Mitra's birthday! Mitra is the owner of Impression Obsession and has graciously allowed me be to be a part of her design team. As a thank you, many of us are posting birthday cards to help her celebrate her special day. I am posting a card using the circle elements set I recently received. I was chomping at the bit to play with these images!

The set comes with all kinds of circles, but I decided I wanted to use one that didn't come in the set. What is a crafter to do? Improvise of course! I wanted a larger scallop image for the outside ring of the birthday circle, so I flipped the scallop stamp over and used the backside as a stamp. I essentially made my own shadow stamp. Confused? Here are some photos to help explain:


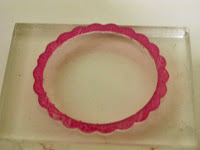
This is the back/flat side of my scallop stamp. I inked it up with a medium pink pigment ink. The front-side of the stamp is holding the stamp to the acrylic block.


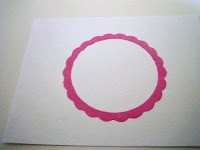
This is what it looked like when I stamped the ring onto some white cardstock. I didn't take a very good picture of this step because the ring looks dark. Trust me, you will see later on that it is the lighter pink of the two inks I used. I cleaned my stamp really well and then reattached it to my acrylic block so that it was then face-side up.

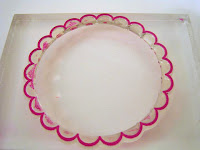
I inked the face of the stamp with a dark pink pigment ink and then stamped it on top of my lighter pink scallop.

This is the result I got. I could have left it as-is, but I decided I wanted to cut it out. I could have gotten similar results by stamping the scallop shadow, cutting it out, and edging it with a dark pink pen. However, I am HORRIBLE at edging scallops, and this worked better for me. Try this technique out with your clear stamps. It is a lot of fun! Another way I took advantage of using clear stamps was with the "happy birthday" sentiment. The saying comes as a horizontal stamp. I decided I wanted to place the "happy" on top of the "birthday," so I cut my stamp in half. Now I can place the words wherever I want. You can't do that with a wood mount stamp!

To finish the card, I stamped some of the stitched circles onto some pink spotted paper (had to continue the circle theme). I added a ribbon and then popped my birthday circle up with some pop dots.

If you want other birthday card ideas (and who doesn't), check out the cards made by Daniela, Deborah, Julie, Kelli, Tina and Penny.

Oh, and for those of you who are wondering about my anniversary blog candy, the winner is....
Jennifer! Jennifer posted a comment that was chosen by the integer generator at random.org. Here is her winning post:
Jennifer said...
Happy Anniversary Laura. Look forward to many more years of reading your blog.
May 14, 2008 8:28 AM
Please email me Jennifer, and I will get your goodies to you.

I also awarded a prize to a randomly chosen subscriber to my blog. I am emailing her directly. I don't know her name, and I thought it would be poor form to post her email address on my blog!

Wednesday, May 14, 2008

One year today...


Today is my one year anniversary of blogging. Woo hoo! So far, so good. I still feel as though I am learning how to be a blogger as well as how to fit it into my life. I can't wait to see what the second year will bring. Thank you to all of you who have left such nice comments for me. I love reading them!

Speaking of comments, today is the last day you can leave a comment to try and win my one year anniversary blog candy. Good luck! Check back tomorrow to see the winners and also to see a card I made for another blog challenge. Yes, I will be posting TWO days in a row! Who knew I had it in me?

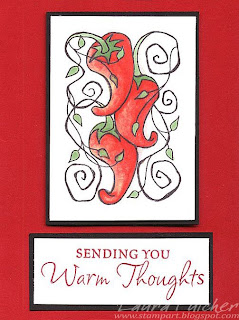
For today's card, I am using another of my new Impression Obsession stamps. Leigh Hannan designed a whole selection of fruit and vegetable images, but when I saw the chiles, I knew I had to have them. I think my years living in New Mexico instilled in me a strong appreciation of chiles. In New Mexico, chiles are important enough that they actually voted for the state question to be "red or green?" Seriously, there is a state question! But I digress...

For this card, I stamped the chilies with a Memento black pad and colored them with copic markers. I colored the right side of the chilies with a red marker and then gradually mixed in some browns as I moved left. Because I scanned the photo instead of taking a picture, it is hard to see the brown. It looks more white to me. Oh well, you still get the idea that I wanted to shade the chiles so they wouldn't be a flat red color. I plan to use the chiles on other cards that say things like "warm wishes, warm thanks, warm hello," etc. I think it is quite practical!

By the way, my answer to the New Mexico state question is green chile....from Hatch, NM. I became a chile snob in New Mexico. Sigh.

Sunday, May 11, 2008

Happy Mothers Day!

Greetings everyone, and happy Mother's Day! One of the perks of having a blog is that you can share your thoughts with the world (literally). So, if I want the world to know how great my mom is and how much she means to me, I can do it. I just HAD to a post a picture of my mom today. I hope she doesn't kill me. Somehow this wonderful person ended up with these two ruffians:


I tried to find a picture of my brother in his 70's orange suit, but I couldn't find one. Rats. Yes, my mom has had to put up with a lot from us. When we get together these days, Clint and I tend to to make teasing her a tag-team event. I think we do it to get "the look." It never fails to amuse us. I often ask my mom, "don't you wish you ended up with good kids?" She always says, "yes, I really do." You have to appreciate that!

The one thing my mom can count on is that even though she ended up with two ruffians, she also ended up with two people who know and appreciate how great she is. We know she is smart, kind, funny, interesting, and loving. We know she is up to trying trying new things, visiting new places, and meeting new people. She is quick to laugh, accepting of others, fun to be around, and provides an endless source of support. I love you, mom! Did this get too sappy?


It seems weird to go from the mush post to the crafting post, but here goes. I made this card with my mom in mind in anticipation of our get-together in June. Did I mention in her list of qualities that she is also a big winner? During her last visit here, she won us a weekend trip to a luxury resort that includes lodging, spa treatments, a fancy dinner, and wine tastings? I can't wait! I always like spending time with my mom, but I think I will like it even more living in luxury. :)

To make the card, I used my new travel set from Hero Arts. I stamped the sayings onto some white tabs I and attached them to the top piece of the card. I stamped the tag onto some Cosmo Cricket paper and cut it out. The patterned papers did all of the coloring for me. Great! The card has a lot of elements, but it came together quickly. Sometimes I think if you limit yourself to certain stamps and papers and force yourself to make a card with them, it goes quicker. I think sometimes I spend the most time just trying to pick out which stamps to use with which sayings, etc.

I hope everyone has a very happy Mother's Day! Don't forget about the blog candy give away on the 14th. Leave a comment today about your mom, an important woman in your life, or if you know my mom, leave a kind message for her for a chance to win the goodies.

Thursday, May 8, 2008

Blog Candy

I knew it was coming up, but I didn't realize it was next week. What am I talking about? My blog anniversary of course! Can you believe that it has been one year since I started blogging? I have learned so much over the past year and have enjoyed sharing my cards/life with you.

I really would like to say thank you for visiting my blog. I know I am not a consistent blogger. I know that I tend to cover a wide array of topics from stamping, to baseball, to daytrips, to gluing google eyes onto plants. Thanks for hanging in there with me through it all.

Enough of the mushy stuff! Who wants gratitude when you can have goodies?! :) As a tangible expression of my appreciation, I would like to do two blog candy giveaways for my May 14th anniversary.

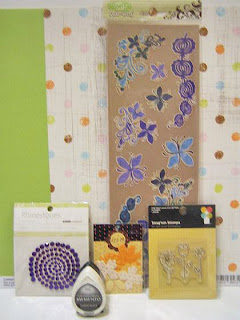
The first giveaway will be randomly selected from the comments left on my blog from today until the 14th. You will be allowed one comment per post till the 14th. If I post twice, you have the chance to have two entries, if I post three times, you can have up to three entries, etc. You can win a selection of goodies that includes rhinestones, flowers, Lasting Impressions stencil paper, the cutest SEI bird rub ons, a clear stamp, my favorite new ink pad, and a Stardust pen (not pictured).


The second giveaway will be for the people who subscribe to my blog. I figure if you agree to receive all of my posts, you might as well have the chance to get something good out of it! On the 14th, I will randomly select one of my email subscribers to win a package that includes rhinestones, Lasting Impressions stencil paper, SassafrasLass floral rub-ons, a clear stamp, flowers, my new favorite inkpad, and a Stardust pen (not pictured).


In many contests, the rules state that friends and family aren't eligible. However, in this case, if I discounted people I know, there wouldn't be many people left! So, everyone (except my brother) is eligible....even my mom. I figure she deserves a chance considering she has probably left the most posts out of anyone. However, she doesn't get any extra entries for giving birth to me. Man, am I harsh, or what?

In the unlikely event that the same person wins both prizes, I will email them and let them pick the prize they want most and draw a second winner. It is better to share the wealth!

So, go ahead and leave me some comments. Comment about anything...my blog, stamping in general, the Washington Nationals, etc. You just might win some loot! All I ask is that you please be kind. :) Thanks again for viewing my blog!

PS to my brother- sorry I left you out, but you know you would just do an obnoxious victory dance if you won. We are too much alike.

Sunday, May 4, 2008

Story Challenge

The challenge last week at the Hero Arts blog was to create something telling your story by using Hero Arts stamps. It was definitely a challenge. First I had to find stamps that I felt represented me AND were made by Hero Arts. Then I had to piece together a collage. I love looking at collages but don't have much experience making my own.

I am a voracious reader, so I wanted to include books in my collage. I don't have a HA book stamp, so I decided to use pages from a book. Yes, I defaced a book for this project. Would it help if I said it wasn't a very good book? I took one page and spritzed the entire thing with gold Glimmer mist. I then took a second page and tore it into smaller pieces. I colored half of the pieces with a green Copic marker and half with a blue marker. The Copics worked well because they let the print show through the color. I glued the colored pieces randomly onto the shinny gold page and let it dry. I left some of the gold uncovered so that I would have parts of the paper that were gold, parts that were blue, and parts that were green. I then stamped the "L," the heart, and the butterfly onto the paper using black Versafine ink. I cut out each of the elements and glued them onto my card.

The map on the card was stamped onto clear vellum using blue Staz On. I cut out a compass from printed paper and glued it under the vellum so that it became part of the map (it is located underneath the flower). I enjoy using this technique on my cards. I love the effects you can get by letting interesting papers show through vellum. My advice is to try out a piece of vellum over all kinds of paper to see what shows though well. It is hard to predict just by looking at the papers. You really need to use a trial-and-error with the vellum in hand.

It ended up being an interesting challenge. I spent a LOT more time thinking about the project than actually stamping the card!