Thursday, October 30, 2008

Happy Halloween!

Technically, it isn't Halloween yet. I have about an hour and 15 minutes to go. However, I need to get to bed, so this will have to do. :)

For today's card, I am posting one I made for Hero Art's paper challenge. The challenge was to incorporate patterned papers into your card design. I decided to use a bunch of scraps I had of Basic Grey's Ambrosia line and weave them with black paper to make a background. It took a bit of time, but I was pleased with the finished product. I knew the papers would coordinate because they came from the same line, and the colors seemed to "scream" Halloween to me. (sorry for that). I tried to vary the widths of the paper so that it would look a little more interesting. To finish the card, I added a pumpkin and saying from Hero Arts. The pumpkin was colored with Copic markers (of course).

I hope you all have a Spooktacular Halloween! (Sorry again).

Tuesday, October 28, 2008

Playing with an Airbrush

One of the things I got to play with during the Copic certification class was their airbrush system. I went from from wanting one to "needing" one over the course of a few hours. Sad. So sad. I am posting a couple of cards today that I did while playing with the airbrush. I am still learning, but it is just so much fun!

The first card is one I made by spraying a Glimmer Chip with yellow, orange, and red Copic markers. The bird chip was originally plain white with a brown swirl in the center. I simply added some color to the top. The whole thing took about 10 seconds.

For the second card, I experimented with spraying on top of a stencil. The base of the card was a yellow/orange paint chip. I placed a flourish stencil on top and sprayed around the stencil with an orange marker. To finish the card, I stamped some brown leaves over the whole thing. I still need to practice, but playing with the airbrush gave me a ton of ideas of things I would like to try with it.

On a personal note, I was lucky enough to go to VA Beach last weekend to visit my mom and brother. It was just before the weather turned cold, and it was simply beautiful at the beach. For those of you who need a serenity beach moment, I am including a picture:

Tuesday, October 21, 2008

IO Design Team Challenge-Tags!

Time again for another Impression Obsession Design Team Challenge! This time the theme was "tags." I thought it would be fun to make a card with a tag as well as some mini tags in time for the upcoming holiday season.

For my fall tag card, I ran some cream paper through an Accu-Cut machine to cut out my tag. I then stamped a maple leaf repeatedly over the tag using yellow, orange, and red inks. To finish the tag, I sponged some yellow ink and lightly splattered some brown paint so that the tag wasn't so stark in color. To complete the card, I layered the tag onto brown paper, added a leaf border, and popped a saying up on top of the tag.

After making the card, I decided to make some quick and easy tags for my holiday presents. If you are like me, you might be planning to make your own gifts this year. Adding a handmade tag to your gift is a great way to embellish your present.

For my three mini tags, I used one of my favorite IO sets called "handmade." For the left and right tags, I simply stamped an image in black ink onto an office tag. I don't think you can get any easier than that! The right tag was embellished with a rhinestone heart, so that did add an extra 10 seconds to the project. :) For the center tag, I stamped my saying in the center and added a flourish around the edges. To finish the center tag, I added some rhinestones and some red Stickles to the flourishes. I decided I liked the extra bling on the card.

If you would like to see more tag ideas, check out more samples made by Daniela, Deborah, Kelli, Julie, and Dina.

Well, I'm off to bed. It was a late night for me. I was lucky enough to have the chance to go into DC tonight and see Jason Mraz. He is definitely one of my favorite artists. I had a fantastic time at the concert even though the person behind me spilled a glass of wine down my back. At least it was white! In case you need a little Mraz fix today, I am including a link to his "I'm Yours" video. Jason Rocks!!

Saturday, October 18, 2008

Trying to Catch Up

I have to confess I sort of forgot about blogging this week. I feel like I am trying to catch up with everything and not getting much accomplished. Currently, I am trying to prepare for my Holiday 10 in 10 class next week. I assume it will all get done. :)

For today's cards, I am posting 2 of the 10 cards for next week's class. I love to do the 10 in 10 classes, but there is so much planning involved. I want quick cards that all look different from each other (and previous years) and use various mediums and tools. Then I have to plan how to organize the classroom so that cards that use the same materials are next to each other. Finally, I have to prep materials for 10 cards per student and check to make sure items I use haven't been discontinued. Yikes!

The snow scene above was really easy to make. It is a brayered background with trees (Stamp A Mania) stamped in Brilliance Moonlight White. I added some white reinker under the trees to look more like a winter ground and a saying by Inkadinkado to finish the card.

The second card had to be changed because I originally used a stamp that was discontinued (should have checked that first). The background Christmas words are by Inkadinkado and the holly is by Kodomo. I stamped the holly with green VersaFine ink and colored them with Prismacolor pencils. If you wanted, you could make the card even faster if you used patterned paper instead of a stamped background and stamped holly.

I hope everyone has a wonderful weekend!

Monday, October 13, 2008

Masculine Cards

Last week's Hero Arts challenge was to design a card with a masculine look. I am posting the two cards I designed. Both involved the use of cork and both required a trip to Home Depot for hardware. After all, I needed gold hardware and not silver hardware! Sigh...I am such a girl.

For the first card, I stamped a bunch of ferns onto cork using Colorbox Chalk Dark Brown ink. I find that pigment ink stamps better on cork than dye ink. I added a saying and then layered some gold washers and nuts to the bottom of the card. Diamond Glaze worked really well to hold the heavy metal accents to each other and to my card.

For the second hard, I wanted to have a "floral" card even though it was a card for a man. I stamped some abstract Hero Arts blotches onto cream paper using the same brown ink as before. I cut out the blotches and then added washers and nuts to the centers. There is a brown brad in each of the center holes, but they aren't holding the hardware to the card. Once again, Diamond Glaze came to the rescue! I stamped some stitches to the bottom cork piece and then added a saying to finish the card.

A couple of side notes about the cards. First, I think I used all discontinued stamps...sorry! Hero Arts tends to come up with new stuff all the time, but they also discontinue stamps quickly as well. It is hard to keep up with them! I did try to use some generic images. I am sure many of you have similar stamps already. Second, when working with cork, you need to be careful where you place it on your card. It is hard to pull the cork back up if you decide to move it to a different location. Once it is down, it is down.

Thursday, October 9, 2008

Halloween!!

I can't remember the last time I was on a crafting roll. I am usually lucky to make ONE card in an evening. I wish I were a prolific crafting machine, but I'm not. Therefore, I was ecstatic to make four cards the other night. That's right....four in one night! If you are good with math, you might notice only three cards here. The fourth I am going to try to get published, so I can't post it online.

I think one thing that helped me create more items was that I limited myself to two stamp sets by My Favorite Things, my black Memento pad, my Copic markers, and a pack of Memory Box papers. Then I was good to go! I find that if you take away a lot of your choices, you don't spend as much time second guessing yourself.

You can't tell from the picture but there is clear Spica pen on the cobwebs and green Spica on the cauldron steam to make them shimmery. The cauldron and ingredients are also coated with Diamond Glaze to add some visual interest.

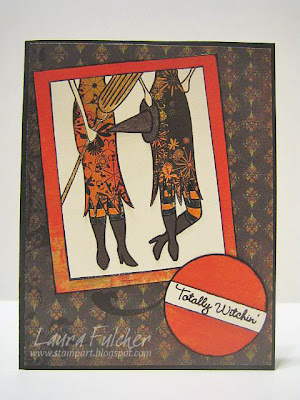
The final card was created with paper piecing. I stamped the witches onto cream paper and again a couple of times onto some patterned paper. I then cut out elements such as the dresses and hats and glued them to the image stamped on cream paper.

Tuesday, October 7, 2008

Pop Up Card

I have to admit that I am a big Jennifer McGuire fan. I love her blog as well as all of the cool videos she makes. For today's card, I am posting one that I made after following one of her videos on making a pop up card. If you are interested in the technique, you can see the video here.

I included a link to the video because there is no way I could describe the steps adequately here. Basically, you will end up with a card that lays flat, but when you pull the tab, it will stand up and reveal a message.

Here is a picture of the card standing up:

The cupcake stand and saying are both from a clear set made by Impression Obsession, and the image was colored with a variety of Copic markers. Here is a side view of the card:

It really is a fun technique. The only thing I wish I had done differently is that I used thin paper. It was easy to fold, but it didn't slide as easily as heavier cardstock does. Ah well. Next time....

Sunday, October 5, 2008

Just Be Claws

For those of you who are bloggers, do you ever have trouble remembering what images you have posted? I made this card a while back, and I just can't remember if I posted it before or not. Yikes! Even if it is the first time posted, I know some of you saw it in August when I taught it as a Make and Take at Angela's Open House. I guess what I am trying to say is please bear with me if this is your third time seeing this card. :)

To make this card, I stamped the lobster (Gina K) with brown Memento ink and colored him with Copic markers. I only used one brown and one red to do the coloring. The bucket looks like several shades because I colored some areas more than once to make them darker. I punched out the lobster using an oval punch and added some real sand to the bottom using Diamond Glaze. I stamped the dots onto red paper and punched them out with an oval scallop punch. I don't know how much you can see from the picture, but I pierced holes around the layers of the card and added some clear gel pen to the lobster so that he is nice and shiny.

In other news, Angela has been posting like crazy on her blog while she is away at a trade show. One of the things she mentioned is that she knows of a stamp store in Rhode Island that burned down and is rebuilding. Angela is collecting card samples from people to help replace what they lost. After all, samples do sell stamps! If you have any samples you would like to contribute, please bring them to the store or send them to:

Angela's Happy Stamper
11411 Sunset Hills Rd.
Suite A
Reston, VA
20190

Angela is sending them out on Oct 10th, but I am sure if we get any late arrivals, we can send them along as well. Particular companies that would be helpful are AMuse, Hero Arts, Impression Obsession, and Memory Box. Basically, anything a retail store would purchase (no Stampin' Up). Who knows, maybe you have a spare card or two from all the World Card Making Day events that happened this weekend. I just thought it couldn't hurt to ask.

Thursday, October 2, 2008

Impression Obsession DT Challenge

It is time for another Impression Obsession Design Team Challenge! This time the theme was gifts/gift sets. I wanted to try something other than a paper craft, so I decided to share a pencil cup I made I made for my desk that is filled with some handy crafting supplies. I know, it kind of defeats the purpose that I made it for myself, but it would make a great gift loaded with craft items for any of your stamping friends.

To make the cup, I started with an unfinished wooden box, sanded it, primed it, and painted it with acrylic paints. I masked it with tape so that I could paint three distinct sections. It is hard to tell from the picture, but the center stripe is metallic. While I had the box masked, I stamped my IO image over the top section using Brilliance Pearlescent Rust ink. It made a nice choice because although it took a while to dry, it did eventually dry and left a nice shimmery image.

If you would like to check out other gift ideas, Daniela, Deborah, Dina, Julie, and Kelli all said they would post something today. Plus, who doesn't need some gift ideas this time of year?

On a personal note, I wanted to share the craziness of the last couple of days. On Tuesday after work, a friend and I drove to Charleston for the Copic Certification class held on Wednesday. We took the class and then drove back. I am mentioning all the timing only because I can't believe we drove 8 hours each way in such a short amount of time. It was an insane trip, but look what I got!!!!

The Copic Class was amazing. Marianne really knows her stuff, and if you love Copic markers, you have to check out her blog. I can't tell you how much information I have gotten from her site! We were given so much information in the class that my head is still swimming. I am already starting to plan a Copics 2 class at Angela's. I will keep you posted.

Here is a picture of me with Marianne while receiving my certificate. I don't look like too much of a crazed Copic fanatic, do I?

Don't answer that.